Introduction to Projection Buffers
I’d like to preface this by thanking Jason Malinowski for his help navigating projection buffers.
One could go a lifetime writing Visual Studio extensions and be forgiven for not understanding or using Visual Studio’s projection buffers. They’re mentioned only briefly on MSDN, and Microsoft has yet to release any samples on how to use them properly.
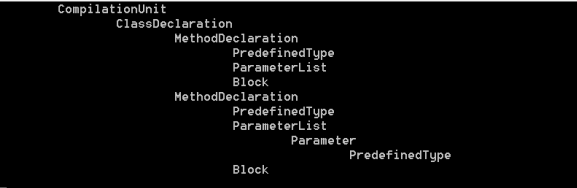
Projection buffers allow us to create composite editors from different source buffers and are used in ASP .Net’s Razor pages that interlace HTML and C#/VB.Net. They can also be used to subset a buffer, and display only this subset to the user. At Code Connect, we’ve used them to display files on a function-by-function basis.
Projection buffers make cool things like this possible:

Today, we’ll be looking at the steps to embed two editors within a Visual Studio Tool Window, one with an original source file and the other with a projection of the first.
Note: This guide is for Visual Studio 2013 + Roslyn. The C#/VB.Net Language Services were largely re-written and their interaction with projection buffers has evolved and changed. As with all Visual Studio extensions, you’ll also need the Visual Studio SDK.
You can download the complete project from Github: https://github.com/JoshVarty/ProjectionBufferTutorial
Step-by-Step Guide
1. Create a new Visual Studio Package with a Tool Window. I’ve named mine ProjectionBufferTutorial.
2. Let Visual Studio know you’ll define a MEF export by following these steps:
- Open source.extension.vsixmanifest in Solution Explorer
- Click Assets
- Click New
- Set Type to: Microsoft.VisualStudio.MefComponent
- Set Source to: A project in current solution
- Set Project to: ProjectionBufferTutorial (or whatever you’ve named your project)
- Click OK
- Save
3. Right click your project and add references to:Microsoft.VisualStudio.Editor.dll
- Microsoft.VisualStudio.Text.UI.Wpf.dll
- Microsoft.VisualStudio.Text.UI.dll
- Microsoft.VisualStudio.Text.Data.dll
- Microsoft.VisualStudio.Text.Logic.dll
- Microsoft.VisualStudio.CoreUtility.dll
- Microsoft.VisualStudio.ComponentModelHost.dll
- System.ComponentModel.Composition.dll
4. Modify MyControl.xaml to contain the following code. This creates two content controls, one for the entire file and one for a subset of the file.
This file contains hidden or bidirectional Unicode text that may be interpreted or compiled differently than what appears below. To review, open the file in an editor that reveals hidden Unicode characters.
Learn more about bidirectional Unicode characters
| <UserControl x:Class="Company.ProjectionBufferTutorial.MyControl" | |
| xmlns="http://schemas.microsoft.com/winfx/2006/xaml/presentation" | |
| xmlns:x="http://schemas.microsoft.com/winfx/2006/xaml" | |
| xmlns:mc="http://schemas.openxmlformats.org/markup-compatibility/2006" | |
| xmlns:d="http://schemas.microsoft.com/expression/blend/2008" | |
| Background="{DynamicResource VsBrush.Window}" | |
| Foreground="{DynamicResource VsBrush.WindowText}" | |
| mc:Ignorable="d" | |
| d:DesignHeight="300" d:DesignWidth="300" | |
| Name="MyToolWindow"> | |
| <Grid> | |
| <Grid.ColumnDefinitions> | |
| <ColumnDefinition /> | |
| <ColumnDefinition /> | |
| </Grid.ColumnDefinitions> | |
| <ContentControl Name="fullFile" Grid.Column="0" /> | |
| <ContentControl Name="partialFile" Grid.Column="1" /> | |
| </Grid> | |
| </UserControl> |
5. Add the following static class VisualStudioServices.cs to your project. This allows us to interface with a number of services within Visual Studio.
This file contains hidden or bidirectional Unicode text that may be interpreted or compiled differently than what appears below. To review, open the file in an editor that reveals hidden Unicode characters.
Learn more about bidirectional Unicode characters
| using System; | |
| using System.Collections.Generic; | |
| using System.Linq; | |
| using System.Text; | |
| using System.Threading.Tasks; | |
| namespace Company.ProjectionBufferTutorial | |
| { | |
| public static class VisualStudioServices | |
| { | |
| public static EnvDTE.DTE DTE | |
| { | |
| get; | |
| set; | |
| } | |
| public static Microsoft.VisualStudio.OLE.Interop.IServiceProvider OLEServiceProvider | |
| { | |
| get; | |
| set; | |
| } | |
| public static System.IServiceProvider ServiceProvider | |
| { | |
| get; | |
| set; | |
| } | |
| } | |
| } |
6. Modify ProjectionBufferTutorialPackage.cs (or <YourName>Package.cs) to contain the following. This initializes the various static Visual Studio services for us to use.
This file contains hidden or bidirectional Unicode text that may be interpreted or compiled differently than what appears below. To review, open the file in an editor that reveals hidden Unicode characters.
Learn more about bidirectional Unicode characters
| using System; | |
| using System.Diagnostics; | |
| using System.Globalization; | |
| using System.Runtime.InteropServices; | |
| using System.ComponentModel.Design; | |
| using Microsoft.Win32; | |
| using Microsoft.VisualStudio; | |
| using Microsoft.VisualStudio.Shell.Interop; | |
| using Microsoft.VisualStudio.OLE.Interop; | |
| using Microsoft.VisualStudio.Shell; | |
| namespace Company.ProjectionBufferTutorial | |
| { | |
| [PackageRegistration(UseManagedResourcesOnly = true)] | |
| [InstalledProductRegistration("#110", "#112", "1.0", IconResourceID = 400)] | |
| [ProvideMenuResource("Menus.ctmenu", 1)] | |
| [ProvideToolWindow(typeof(MyToolWindow))] | |
| [Guid(GuidList.guidProjectionBufferTutorialPkgString)] | |
| public sealed class ProjectionBufferTutorialPackage : Package | |
| { | |
| public ProjectionBufferTutorialPackage() | |
| { | |
| } | |
| private void ShowToolWindow(object sender, EventArgs e) | |
| { | |
| ToolWindowPane window = this.FindToolWindow(typeof(MyToolWindow), 0, true); | |
| if ((null == window) || (null == window.Frame)) | |
| { | |
| throw new NotSupportedException(Resources.CanNotCreateWindow); | |
| } | |
| IVsWindowFrame windowFrame = (IVsWindowFrame)window.Frame; | |
| Microsoft.VisualStudio.ErrorHandler.ThrowOnFailure(windowFrame.Show()); | |
| } | |
| protected override void Initialize() | |
| { | |
| Debug.WriteLine (string.Format(CultureInfo.CurrentCulture, "Entering Initialize() of: {0}", this.ToString())); | |
| base.Initialize(); | |
| OleMenuCommandService mcs = GetService(typeof(IMenuCommandService)) as OleMenuCommandService; | |
| if ( null != mcs ) | |
| { | |
| CommandID toolwndCommandID = new CommandID(GuidList.guidProjectionBufferTutorialCmdSet, (int)PkgCmdIDList.cmdidMyTool); | |
| MenuCommand menuToolWin = new MenuCommand(ShowToolWindow, toolwndCommandID); | |
| mcs.AddCommand( menuToolWin ); | |
| } | |
| VisualStudioServices.ServiceProvider = this; | |
| VisualStudioServices.OLEServiceProvider = (Microsoft.VisualStudio.OLE.Interop.IServiceProvider)VisualStudioServices.ServiceProvider.GetService(typeof(Microsoft.VisualStudio.OLE.Interop.IServiceProvider)); | |
| } | |
| } | |
| } |
7. Add the following code to MyToolWindow.cs. The amount of boilerplate is an absolutely astonishing, but necessary evil. This class creates two WpfTextViewHosts representing the full file. However, it attaches the custom role “CustomProjectionRole” to one. It then adds start position and end position properties to the text buffer. We’ll use these to define the range of text we’d like to project.
Note: Make sure to modify filePath to point to a valid C# file on your machine.
Note: DO NOT OVERWRITE THE GUID AT THE TOP OF YOUR CLASS. This Guid is randomly generated and stored in Guids.cs. These two must match, therefore make sure to use your own.
This file contains hidden or bidirectional Unicode text that may be interpreted or compiled differently than what appears below. To review, open the file in an editor that reveals hidden Unicode characters.
Learn more about bidirectional Unicode characters
| using System; | |
| using System.Linq; | |
| using System.Collections; | |
| using System.ComponentModel; | |
| using System.Drawing; | |
| using System.Data; | |
| using System.Windows; | |
| using System.Runtime.InteropServices; | |
| using Microsoft.VisualStudio.Shell.Interop; | |
| using Microsoft.VisualStudio.Shell; | |
| using Microsoft.VisualStudio.OLE.Interop; | |
| using Microsoft.VisualStudio; | |
| using Microsoft.VisualStudio.TextManager.Interop; | |
| using Microsoft.VisualStudio.Editor; | |
| using Microsoft.VisualStudio.Text.Editor; | |
| using Microsoft.VisualStudio.ComponentModelHost; | |
| using System.Windows.Forms; | |
| namespace Company.ProjectionBufferTutorial | |
| { | |
| [Guid("4a2b96fc-bf73-420e-ad92-dbc15aac6b39")] | |
| public class MyToolWindow : ToolWindowPane, IOleCommandTarget | |
| { | |
| private string filePath = @"C:\Users\Josh\Documents\Visual Studio 2013\Projects\ConsoleApplication1\ConsoleApplication1\Program.cs"; | |
| IComponentModel _componentModel; | |
| IVsInvisibleEditorManager _invisibleEditorManager; | |
| //This adapter allows us to convert between Visual Studio 2010 editor components and | |
| //the legacy components from Visual Studio 2008 and earlier. | |
| IVsEditorAdaptersFactoryService _editorAdapter; | |
| ITextEditorFactoryService _editorFactoryService; | |
| IVsTextView _currentlyFocusedTextView; | |
| public MyToolWindow() : base(null) | |
| { | |
| this.Caption = Resources.ToolWindowTitle; | |
| this.BitmapResourceID = 301; | |
| this.BitmapIndex = 1; | |
| _componentModel = (IComponentModel)Microsoft.VisualStudio.Shell.Package.GetGlobalService(typeof(SComponentModel)); | |
| _invisibleEditorManager = (IVsInvisibleEditorManager)Microsoft.VisualStudio.Shell.Package.GetGlobalService(typeof(SVsInvisibleEditorManager)); | |
| _editorAdapter = _componentModel.GetService<IVsEditorAdaptersFactoryService>(); | |
| _editorFactoryService = _componentModel.GetService<ITextEditorFactoryService>(); | |
| } | |
| /// <summary> | |
| /// Creates an invisible editor for a given filePath. | |
| /// If you're frequently creating projection buffers, it may be worth caching | |
| /// these editors as they're somewhat expensive to create. | |
| /// </summary> | |
| private IVsInvisibleEditor GetInvisibleEditor(string filePath) | |
| { | |
| IVsInvisibleEditor invisibleEditor; | |
| ErrorHandler.ThrowOnFailure(this._invisibleEditorManager.RegisterInvisibleEditor( | |
| filePath | |
| , pProject: null | |
| , dwFlags: (uint)_EDITORREGFLAGS.RIEF_ENABLECACHING | |
| , pFactory: null | |
| , ppEditor: out invisibleEditor)); | |
| return invisibleEditor; | |
| } | |
| public IWpfTextViewHost CreateEditor(string filePath, int start = 0, int end = 0, bool createProjectedEditor = false) | |
| { | |
| //IVsInvisibleEditors are in-memory represenations of typical Visual Studio editors. | |
| //Language services, highlighting and error squiggles are hooked up to these editors | |
| //for us once we convert them to WpfTextViews. | |
| var invisibleEditor = GetInvisibleEditor(filePath); | |
| var docDataPointer = IntPtr.Zero; | |
| Guid guidIVsTextLines = typeof(IVsTextLines).GUID; | |
| ErrorHandler.ThrowOnFailure(invisibleEditor.GetDocData( | |
| fEnsureWritable: 1 | |
| , riid: ref guidIVsTextLines | |
| , ppDocData: out docDataPointer)); | |
| IVsTextLines docData = (IVsTextLines)Marshal.GetObjectForIUnknown(docDataPointer); | |
| //Create a code window adapter | |
| var codeWindow = _editorAdapter.CreateVsCodeWindowAdapter(VisualStudioServices.OLEServiceProvider); | |
| ErrorHandler.ThrowOnFailure(codeWindow.SetBuffer(docData)); | |
| //Get a text view for our editor which we will then use to get the WPF control for that editor. | |
| IVsTextView textView; | |
| ErrorHandler.ThrowOnFailure(codeWindow.GetPrimaryView(out textView)); | |
| if (createProjectedEditor) | |
| { | |
| //We add our own role to this text view. Later this will allow us to selectively modify | |
| //this editor without getting in the way of Visual Studio's normal editors. | |
| var roles = _editorFactoryService.DefaultRoles.Concat(new string[] { "CustomProjectionRole" }); | |
| var vsTextBuffer = docData as IVsTextBuffer; | |
| var textBuffer = _editorAdapter.GetDataBuffer(vsTextBuffer); | |
| textBuffer.Properties.AddProperty("StartPosition", start); | |
| textBuffer.Properties.AddProperty("EndPosition", end); | |
| var guid = VSConstants.VsTextBufferUserDataGuid.VsTextViewRoles_guid; | |
| ((IVsUserData)codeWindow).SetData(ref guid, _editorFactoryService.CreateTextViewRoleSet(roles).ToString()); | |
| } | |
| _currentlyFocusedTextView = textView; | |
| var textViewHost = _editorAdapter.GetWpfTextViewHost(textView); | |
| return textViewHost; | |
| } | |
| private IWpfTextViewHost _completeTextViewHost; | |
| public IWpfTextViewHost CompleteTextViewHost | |
| { | |
| get | |
| { | |
| if (_completeTextViewHost == null) | |
| { | |
| _completeTextViewHost = CreateEditor(filePath); | |
| } | |
| return _completeTextViewHost; | |
| } | |
| } | |
| private IWpfTextViewHost _projectedTextViewHost; | |
| public IWpfTextViewHost ProjectedTextViewHost | |
| { | |
| get | |
| { | |
| if (_projectedTextViewHost == null) | |
| { | |
| _projectedTextViewHost = CreateEditor(filePath, start: 0, end: 100, createProjectedEditor: true); | |
| } | |
| return _projectedTextViewHost; | |
| } | |
| } | |
| private MyControl _myControl; | |
| public override object Content | |
| { | |
| get | |
| { | |
| if (_myControl == null) | |
| { | |
| _myControl = new MyControl(); | |
| _myControl.fullFile.Content = CompleteTextViewHost; | |
| _myControl.partialFile.Content = ProjectedTextViewHost; | |
| } | |
| return _myControl; | |
| } | |
| } | |
| public override void OnToolWindowCreated() | |
| { | |
| //We need to set up the tool window to respond to key bindings | |
| //They're passed to the tool window and its buffers via Query() and Exec() | |
| var windowFrame = (IVsWindowFrame)Frame; | |
| var cmdUi = Microsoft.VisualStudio.VSConstants.GUID_TextEditorFactory; | |
| windowFrame.SetGuidProperty((int)__VSFPROPID.VSFPROPID_InheritKeyBindings, ref cmdUi); | |
| base.OnToolWindowCreated(); | |
| } | |
| protected override bool PreProcessMessage(ref Message m) | |
| { | |
| if (CompleteTextViewHost != null) | |
| { | |
| // copy the Message into a MSG[] array, so we can pass | |
| // it along to the active core editor's IVsWindowPane.TranslateAccelerator | |
| var pMsg = new MSG[1]; | |
| pMsg[0].hwnd = m.HWnd; | |
| pMsg[0].message = (uint)m.Msg; | |
| pMsg[0].wParam = m.WParam; | |
| pMsg[0].lParam = m.LParam; | |
| var vsWindowPane = (IVsWindowPane)_currentlyFocusedTextView; | |
| return vsWindowPane.TranslateAccelerator(pMsg) == 0; | |
| } | |
| return base.PreProcessMessage(ref m); | |
| } | |
| int IOleCommandTarget.Exec(ref Guid pguidCmdGroup, uint nCmdID, uint nCmdexecopt, | |
| IntPtr pvaIn, IntPtr pvaOut) | |
| { | |
| var hr = | |
| (int)Microsoft.VisualStudio.OLE.Interop.Constants.OLECMDERR_E_NOTSUPPORTED; | |
| if (_currentlyFocusedTextView != null) | |
| { | |
| var cmdTarget = (IOleCommandTarget)_currentlyFocusedTextView; | |
| hr = cmdTarget.Exec(ref pguidCmdGroup, nCmdID, nCmdexecopt, pvaIn, pvaOut); | |
| } | |
| return hr; | |
| } | |
| int IOleCommandTarget.QueryStatus(ref Guid pguidCmdGroup, uint cCmds, OLECMD[] | |
| prgCmds, IntPtr pCmdText) | |
| { | |
| var hr = | |
| (int)Microsoft.VisualStudio.OLE.Interop.Constants.OLECMDERR_E_NOTSUPPORTED; | |
| if (_currentlyFocusedTextView != null) | |
| { | |
| var cmdTarget = (IOleCommandTarget)_currentlyFocusedTextView; | |
| hr = cmdTarget.QueryStatus(ref pguidCmdGroup, cCmds, prgCmds, pCmdText); | |
| } | |
| return hr; | |
| } | |
| } | |
| } |
8. Finally, add a new file to the project called ProjectionTextViewModelProvider.cs. This class listens for the creation of WpfTextViews with the role “CustomProjectionRole”. It then modifies the visual buffer to display only a subset of the original file.
This file contains hidden or bidirectional Unicode text that may be interpreted or compiled differently than what appears below. To review, open the file in an editor that reveals hidden Unicode characters.
Learn more about bidirectional Unicode characters
| using System; | |
| using System.Collections.Generic; | |
| using System.ComponentModel.Composition; | |
| using System.Linq; | |
| using System.Text; | |
| using System.Threading.Tasks; | |
| using Microsoft.VisualStudio.Text; | |
| using Microsoft.VisualStudio.Text.Editor; | |
| using Microsoft.VisualStudio.Text.Projection; | |
| using Microsoft.VisualStudio.Utilities; | |
| namespace Company.ProjectionBufferTutorial | |
| { | |
| /// <summary> | |
| /// Whenever CSharp WpfTextViews are created with the CustomProjectionRole role | |
| /// this class will run and create a custom text view model for the WpfTextView | |
| /// </summary> | |
| [Export(typeof(ITextViewModelProvider)), ContentType("CSharp"), TextViewRole("CustomProjectionRole")] | |
| internal class ProjectionTextViewModelProvider : ITextViewModelProvider | |
| { | |
| public ITextViewModel CreateTextViewModel(ITextDataModel dataModel, ITextViewRoleSet roles) | |
| { | |
| //Create a projection buffer based on the specified start and end position. | |
| var projectionBuffer = CreateProjectionBuffer(dataModel); | |
| //Display this projection buffer in the visual buffer, while still maintaining | |
| //the full file buffer as the underlying data buffer. | |
| var textViewModel = new ProjectionTextViewModel(dataModel, projectionBuffer); | |
| return textViewModel; | |
| } | |
| public IProjectionBuffer CreateProjectionBuffer(ITextDataModel dataModel) | |
| { | |
| //retrieve start and end position that we saved in MyToolWindow.CreateEditor() | |
| var startPosition = (int)dataModel.DataBuffer.Properties.GetProperty("StartPosition"); | |
| var endPosition = (int)dataModel.DataBuffer.Properties.GetProperty("EndPosition"); | |
| var length = endPosition – startPosition; | |
| //Take a snapshot of the text within these indices. | |
| var textSnapshot = dataModel.DataBuffer.CurrentSnapshot; | |
| var trackingSpan = textSnapshot.CreateTrackingSpan(startPosition, length, SpanTrackingMode.EdgeExclusive); | |
| //Create the actual projection buffer | |
| var projectionBuffer = ProjectionBufferFactory.CreateProjectionBuffer( | |
| null | |
| , new List<object>() { trackingSpan } | |
| , ProjectionBufferOptions.None | |
| ); | |
| return projectionBuffer; | |
| } | |
| [Import] | |
| public IProjectionBufferFactoryService ProjectionBufferFactory { get; set; } | |
| } | |
| internal class ProjectionTextViewModel : ITextViewModel | |
| { | |
| private readonly ITextDataModel _dataModel; | |
| private readonly IProjectionBuffer _projectionBuffer; | |
| private readonly PropertyCollection _properties; | |
| //The underlying source buffer from which the projection was created | |
| public ITextBuffer DataBuffer | |
| { | |
| get | |
| { | |
| return _dataModel.DataBuffer; | |
| } | |
| } | |
| public ITextDataModel DataModel | |
| { | |
| get | |
| { | |
| return _dataModel; | |
| } | |
| } | |
| public ITextBuffer EditBuffer | |
| { | |
| get | |
| { | |
| return _projectionBuffer; | |
| } | |
| } | |
| // Displays our projection | |
| public ITextBuffer VisualBuffer | |
| { | |
| get | |
| { | |
| return _projectionBuffer; | |
| } | |
| } | |
| public PropertyCollection Properties | |
| { | |
| get | |
| { | |
| return _properties; | |
| } | |
| } | |
| public void Dispose() | |
| { | |
| } | |
| public ProjectionTextViewModel(ITextDataModel dataModel, IProjectionBuffer projectionBuffer) | |
| { | |
| this._dataModel = dataModel; | |
| this._projectionBuffer = projectionBuffer; | |
| this._properties = new PropertyCollection(); | |
| } | |
| public SnapshotPoint GetNearestPointInVisualBuffer(SnapshotPoint editBufferPoint) | |
| { | |
| return editBufferPoint; | |
| } | |
| public SnapshotPoint GetNearestPointInVisualSnapshot(SnapshotPoint editBufferPoint, ITextSnapshot targetVisualSnapshot, PointTrackingMode trackingMode) | |
| { | |
| return editBufferPoint.TranslateTo(targetVisualSnapshot, trackingMode); | |
| } | |
| public bool IsPointInVisualBuffer(SnapshotPoint editBufferPoint, PositionAffinity affinity) | |
| { | |
| return true; | |
| } | |
| } | |
| } |
Important: Point the private string filePath to a valid C# file on your file system. Run the project.
9. Open the solution containing your chosen file. Click View > Other Windows > ProjectionBufferTutorial (or whatever you’ve named your project)
A tool window will open containing two files, the right being a subset of the first. As you make changes to one, the changes are instantly reflected in the other. All Language Services should be working.
Explanation
I’d first like to hedge this section by saying I don’t work at Microsoft. These APIs are largely undocumented with no samples available on how to correctly use them. My usage of ITextViewModelProvider and various other Visual Studio services borders on cargo cult programming.
That being said, this is my understanding of what’s happening.
MyToolWindow.cs
There’s a lot going on here. For starters, our class inherits from IOleCommandTarget. An entire blog post could (and should) be written on this interface and commanding within Visual Studio. Here’s my quick-and-dirty take on this.
Visual Studio uses the command chain design pattern to route commands. Essentially, a linked list is created of different components (all inheriting from IOleCommandTarget) that are interested in listening to commands. Basic commands include arrow key presses, Ctr-Z, and backspace. For just a sampling of the many possible commands see VSConstants.VSStd97CmdID.
When a command is received by a command filter object, it can do one of the following:
- Handle the command and pass the command down the chain.
- Handle the command and do not pass the command down the chain.
- Do not handle the command, and pass it down the chain.
- Ignore the command completely and not pass it down the chain.
The IOleCommandTarget.Query() method is fired before the command is actually passed down the chain. This method simply probes the chain to see if anyone can even handle the command.
The IOleCommandTarget.Exec() method is fired when the command can be handled. The command is passed down the chain, handled and then an error code is returned. If no error was encountered, the value 0 is returned.
MyToolWindow inherits from IOleCommandTarget and routes commands (backspace, arrow keys, Ctr-Space etc.) to the IVsTextView of the editor.
The other major workhorse within MyToolWindow is CreateEditor(). This method creates an IVsInvisibleEditor for a given filepath. This IVsInvisibleEditor takes care of a lot of background work not relevant to this blog post, including registering the file within the Running Document Table.
We then retrieve the IVsTextLines from this IVsInvisibleEditor and use it to create a new IVsCodeWindow. I believe this code window represents the dual-pane editor we use in Visual Studio when working with any code files. (All code windows are dual pane, drag the slider above the vertical scrollbar if you’re unsure what I’m talking about). Below is a screen shot of a dual-pane window:

After setting the content of this dual-pane window, we can set the roles for it. Common roles include “DOCUMENT” and “ZOOMABLE”. Manipulating these roles allows us to change properties of the code window. For example, we can omit “ZOOMABLE” and remove the ability for the user to zoom in and out. We can also add custom roles, which we’ve done here. We’ve added “CustomProjectionRole” to the text buffer. This will allow us to handle this buffer different in the future and distinguish it from other C# buffers that may have been created by Visual Studio or another plugin.
Finally, we convert the IVsTextView to a IWpfTextViewHost, and object we can embed within typical WPF elements.
ProjectionTextViewModelProvider.cs
There are two classes defined here, ProjectionTextViewModelProvider, and the actual ProjectionTextViewModel that we are providing. The provider’s sole responsibility is to wait for C# text buffers to be created with the role “CustomProjectionRole”. When this happens, it creates a custom view of the buffer to be displayed to the user. It does this by creating a projection buffer and a ProjectionTextViewModel that uses this projection buffer as its VisualBuffer. When VisualStudio goes to display a WpfTextView to a user, it uses the contents of the VisualBuffer.
It’s worth noting that we’ve MEF imported the IProjectionBufferFactoryService (what a majestic name…) in order to create our projection buffer. If you’ve never used MEF before, this will look like magic. (It still does to me).
Hopefully this is enough to get most people started with projection buffers. If you feel overwhelmed, don’t worry, that’s completely natural. One of the unfortunate realities of Visual Studio extensions is that there are an ungodly number of moving parts. The only way to ever hope to understand what is going on is to get your hands dirty. Take this project and start taking things apart and breaking it. You’ll gradually grow more comfortable with the many interfaces and how they interact with one another.
Finally, check out how we’re using this stuff in Code Connect and follow me on Twitter.


