Special thanks to @JasonMalinowski for his help clarifying some of the subtleties of the workspace API. Until this point, we’ve simply been constructing syntax trees from strings. This approach works well when creating short samples, but often we’d like to work with entire solutions. Enter: Workspaces. Workspaces are the root node of a C# hierarchy that consists of a solution, child projects and child documents. A fundamental tenet within Roslyn is that most objects are immutable. This means we can’t hold on to a reference to a solution and expect it to be up-to-date forever. The moment a change is made, this solution will be out of date and a new, updated solution will have been created. Workspaces are our root node. Unlike solutions, projects and documents, they won’t become invalid and always contain a reference to the current, most up-to-date solution. There are four Workspace variants to consider:
The abstract base class for all other workspaces. It’s a little disingenuous to claim that it’s a workspace variant, as you’ll never actually have an instance of it. Instead, this class serves as a sort of API around which actual workspace implementations can be created. It can be tempting to think of workspaces solely within the context of Visual Studio. After all, for most C# developers this is the only way we’ve dealt with solutions and projects. However, Workspace is meant to be agnostic as to the physical source of the files it represents. Individual implementations might store the files on the local filesystem, within a database, or even on a remote machine. One simply inherits from this class and overrides Workspace’s empty implementations as they see fit.
A workspace that has been built to handle MSBuild solution (.sln) and project (.csproj, .vbproj) files. Unfortunately it cannot currently write to .sln files, which means we can’t use it to add projects or create new solutions.
The following example shows how we can iterate over all the documents in a solution:
This file contains hidden or bidirectional Unicode text that may be interpreted or compiled differently than what appears below. To review, open the file in an editor that reveals hidden Unicode characters. Learn more about bidirectional Unicode characters
A workspace that allows one to add solution and project files manually. One should note that the API for adding and removing solution items is different within AdhocWorkspace when compared to the other workspaces. Instead of calling TryApplyChanges(), methods for adding projects and documents are provided at the workspace level. This workspace is meant to be consumed by those who just need a quick and easy way to create a workspace and add projects and documents to it.
This file contains hidden or bidirectional Unicode text that may be interpreted or compiled differently than what appears below. To review, open the file in an editor that reveals hidden Unicode characters. Learn more about bidirectional Unicode characters
The active workspace consumed within Visual Studio packages. As this workspace is tightly integrated with Visual Studio, it’s difficult to provide a small example on how to use this workspace. Steps:
Create a new VSPackage.
Add a reference to the Microsoft.VisualStudio.LanguageServices.dll. It’s now available on NuGet.
Navigate to the <VSPackageName>Package.cs file (where <VSPackageName> is the name you chose for your solution.
Find the Initalize() method.
Place the following code within Initialize()
This file contains hidden or bidirectional Unicode text that may be interpreted or compiled differently than what appears below. To review, open the file in an editor that reveals hidden Unicode characters. Learn more about bidirectional Unicode characters
When writing VSPackages, one of the most useful pieces of functionality exposed by the workspace is the WorkspaceChanged event. This event allows our VSPackage to respond to any changes made by the user or any other VSPackage. Naturally, the best way to familiarize oneself with workspaces is to use them. Roslyn’s immutability can impose a slight learning curve so we’ll be exploring how to modify documents and projects in future posts.
We’re pleased to announce September 2, 2014 as the release date of the Code Connect Alpha.
We’ve released a video that covers some of the features you’ll see in Code Connect next week.
It’s important to stress that Code Connect is far from complete at this point. There remains a lot of work to be done when working with large solutions and undoubtedly many of you will uncover bugs.
In particular, Code Connect currently struggles with large solutions. Our current implementation naively pre-loads the entire solution, which can take considerable time when dealing with projects consisting of more than 200 C# files.
There also remains a lot of work to be done when it comes to the user interface and overall polish. You will continue to see improvements in this area during future releases of Code Connect.
In Part 4, we discussed the abstract CSharpSyntaxWalker and how we could navigate the syntax tree with the visitor pattern. Today, we go one step further with the CSharpSyntaxRewriter, and “modify” the syntax tree as we traverse it. It’s important to note that we’re not actually mutating the original syntax tree, as Roslyn’s syntax trees are immutable. Instead, the CSharpSyntaxRewriter creates a new syntax tree resulting from our changes.
The CSharpSyntaxRewriter can visit all nodes, tokens or trivia within a syntax tree. Like the CSharpSyntaxVisitor, we can selectively choose what pieces of syntax we’d like to visit. We do this by overriding various methods and returning one of the following:
The original, unchanged node, token or trivia.
Null, signalling the node, token or trivia is to be removed.
Roslyn treats all redundant semicolons as part of an EmptyStatementSyntax node. Below, we demonstrate how to solve the base case: an unnecessary semicolon on a line of its own.
This file contains hidden or bidirectional Unicode text that may be interpreted or compiled differently than what appears below. To review, open the file in an editor that reveals hidden Unicode characters. Learn more about bidirectional Unicode characters
The output of this program produces a simple program without any redundant semicolons.
This file contains hidden or bidirectional Unicode text that may be interpreted or compiled differently than what appears below. To review, open the file in an editor that reveals hidden Unicode characters. Learn more about bidirectional Unicode characters
However, odulkanberoglu points out some problems with this approach. When either leading or trailing trivia is present, this trivia is removed. This means, comments above and below the semicolon will be stripped out.
svick has a pretty clever workaround. By constructing an EmptyStatementSyntax with a missing token instead of a semicolon, we can manage to remove the semicolon from the original tree. His approach is demonstrated below:
This file contains hidden or bidirectional Unicode text that may be interpreted or compiled differently than what appears below. To review, open the file in an editor that reveals hidden Unicode characters. Learn more about bidirectional Unicode characters
This file contains hidden or bidirectional Unicode text that may be interpreted or compiled differently than what appears below. To review, open the file in an editor that reveals hidden Unicode characters. Learn more about bidirectional Unicode characters
This approach has the side effect of leaving a blank line wherever there was a redundant semicolon. That being said, I think it’s probably worth the trade-off as there doesn’t seem to be a way to retain trivia otherwise. Ultimately, the trivia can only be retained by attaching it to a node, and then returning that node.
An aside: I suspect this will be the de facto approach to removing any syntax nodes in the future. It’s highly likely that any syntax node one might wish to remove might have associated comment trivia. The only way to remove the node while retaining the trivia is to construct a replacement node. The best candidate for replacement will likely be an EmptyStatementSyntax with a missing semicolon.
This might also indicate a limitation with the CSharpSyntaxRewriter. It seems like it should be easier to remove nodes, while retaining their trivia.
I’d like to preface this by thanking Jason Malinowski for his help navigating projection buffers.
One could go a lifetime writing Visual Studio extensions and be forgiven for not understanding or using Visual Studio’s projection buffers. They’re mentioned only briefly on MSDN, and Microsoft has yet to release any samples on how to use them properly.
Projection buffers allow us to create composite editors from different source buffers and are used in ASP .Net’s Razor pages that interlace HTML and C#/VB.Net. They can also be used to subset a buffer, and display only this subset to the user. At Code Connect, we’ve used them to display files on a function-by-function basis.
Projection buffers make cool things like this possible:
Today, we’ll be looking at the steps to embed two editors within a Visual Studio Tool Window, one with an original source file and the other with a projection of the first.
Note: This guide is for Visual Studio 2013 + Roslyn. The C#/VB.Net Language Services were largely re-written and their interaction with projection buffers has evolved and changed. As with all Visual Studio extensions, you’ll also need the Visual Studio SDK.
1. Create a new Visual Studio Package with a Tool Window. I’ve named mine ProjectionBufferTutorial.
2. Let Visual Studio know you’ll define a MEF export by following these steps:
Open source.extension.vsixmanifest in Solution Explorer
Click Assets
Click New
Set Type to: Microsoft.VisualStudio.MefComponent
Set Source to: A project in current solution
Set Project to: ProjectionBufferTutorial (or whatever you’ve named your project)
Click OK
Save
3. Right click your project and add references to:Microsoft.VisualStudio.Editor.dll
Microsoft.VisualStudio.Text.UI.Wpf.dll
Microsoft.VisualStudio.Text.UI.dll
Microsoft.VisualStudio.Text.Data.dll
Microsoft.VisualStudio.Text.Logic.dll
Microsoft.VisualStudio.CoreUtility.dll
Microsoft.VisualStudio.ComponentModelHost.dll
System.ComponentModel.Composition.dll
4. Modify MyControl.xaml to contain the following code. This creates two content controls, one for the entire file and one for a subset of the file.
This file contains hidden or bidirectional Unicode text that may be interpreted or compiled differently than what appears below. To review, open the file in an editor that reveals hidden Unicode characters. Learn more about bidirectional Unicode characters
5. Add the following static class VisualStudioServices.cs to your project. This allows us to interface with a number of services within Visual Studio.
This file contains hidden or bidirectional Unicode text that may be interpreted or compiled differently than what appears below. To review, open the file in an editor that reveals hidden Unicode characters. Learn more about bidirectional Unicode characters
6. Modify ProjectionBufferTutorialPackage.cs (or <YourName>Package.cs) to contain the following. This initializes the various static Visual Studio services for us to use.
This file contains hidden or bidirectional Unicode text that may be interpreted or compiled differently than what appears below. To review, open the file in an editor that reveals hidden Unicode characters. Learn more about bidirectional Unicode characters
7. Add the following code to MyToolWindow.cs. The amount of boilerplate is an absolutely astonishing, but necessary evil. This class creates two WpfTextViewHosts representing the full file. However, it attaches the custom role “CustomProjectionRole” to one. It then adds start position and end position properties to the text buffer. We’ll use these to define the range of text we’d like to project.
Note: Make sure to modify filePath to point to a valid C# file on your machine.
Note: DO NOT OVERWRITE THE GUID AT THE TOP OF YOUR CLASS. This Guid is randomly generated and stored in Guids.cs. These two must match, therefore make sure to use your own.
This file contains hidden or bidirectional Unicode text that may be interpreted or compiled differently than what appears below. To review, open the file in an editor that reveals hidden Unicode characters. Learn more about bidirectional Unicode characters
8. Finally, add a new file to the project called ProjectionTextViewModelProvider.cs. This class listens for the creation of WpfTextViews with the role “CustomProjectionRole”. It then modifies the visual buffer to display only a subset of the original file.
This file contains hidden or bidirectional Unicode text that may be interpreted or compiled differently than what appears below. To review, open the file in an editor that reveals hidden Unicode characters. Learn more about bidirectional Unicode characters
Important: Point the private string filePath to a valid C# file on your file system. Run the project.
9. Open the solution containing your chosen file. Click View > Other Windows > ProjectionBufferTutorial (or whatever you’ve named your project)
A tool window will open containing two files, the right being a subset of the first. As you make changes to one, the changes are instantly reflected in the other. All Language Services should be working.
Explanation
I’d first like to hedge this section by saying I don’t work at Microsoft. These APIs are largely undocumented with no samples available on how to correctly use them. My usage of ITextViewModelProvider and various other Visual Studio services borders on cargo cult programming.
That being said, this is my understanding of what’s happening.
MyToolWindow.cs
There’s a lot going on here. For starters, our class inherits from IOleCommandTarget. An entire blog post could (and should) be written on this interface and commanding within Visual Studio. Here’s my quick-and-dirty take on this.
Visual Studio uses the command chain design pattern to route commands. Essentially, a linked list is created of different components (all inheriting from IOleCommandTarget) that are interested in listening to commands. Basic commands include arrow key presses, Ctr-Z, and backspace. For just a sampling of the many possible commands see VSConstants.VSStd97CmdID.
When a command is received by a command filter object, it can do one of the following:
Handle the command and pass the command down the chain.
Handle the command and do not pass the command down the chain.
Do not handle the command, and pass it down the chain.
Ignore the command completely and not pass it down the chain.
The IOleCommandTarget.Query() method is fired before the command is actually passed down the chain. This method simply probes the chain to see if anyone can even handle the command.
The IOleCommandTarget.Exec() method is fired when the command can be handled. The command is passed down the chain, handled and then an error code is returned. If no error was encountered, the value 0 is returned.
MyToolWindow inherits from IOleCommandTarget and routes commands (backspace, arrow keys, Ctr-Space etc.) to the IVsTextView of the editor.
The other major workhorse within MyToolWindow is CreateEditor(). This method creates an IVsInvisibleEditor for a given filepath. This IVsInvisibleEditor takes care of a lot of background work not relevant to this blog post, including registering the file within the Running Document Table.
We then retrieve the IVsTextLines from this IVsInvisibleEditor and use it to create a new IVsCodeWindow. I believe this code window represents the dual-pane editor we use in Visual Studio when working with any code files. (All code windows are dual pane, drag the slider above the vertical scrollbar if you’re unsure what I’m talking about). Below is a screen shot of a dual-pane window:
After setting the content of this dual-pane window, we can set the roles for it. Common roles include “DOCUMENT” and “ZOOMABLE”. Manipulating these roles allows us to change properties of the code window. For example, we can omit “ZOOMABLE” and remove the ability for the user to zoom in and out. We can also add custom roles, which we’ve done here. We’ve added “CustomProjectionRole” to the text buffer. This will allow us to handle this buffer different in the future and distinguish it from other C# buffers that may have been created by Visual Studio or another plugin.
Finally, we convert the IVsTextView to a IWpfTextViewHost, and object we can embed within typical WPF elements.
ProjectionTextViewModelProvider.cs
There are two classes defined here, ProjectionTextViewModelProvider, and the actual ProjectionTextViewModel that we are providing. The provider’s sole responsibility is to wait for C# text buffers to be created with the role “CustomProjectionRole”. When this happens, it creates a custom view of the buffer to be displayed to the user. It does this by creating a projection buffer and a ProjectionTextViewModel that uses this projection buffer as its VisualBuffer. When VisualStudio goes to display a WpfTextView to a user, it uses the contents of the VisualBuffer.
It’s worth noting that we’ve MEF imported the IProjectionBufferFactoryService (what a majestic name…) in order to create our projection buffer. If you’ve never used MEF before, this will look like magic. (It still does to me).
Hopefully this is enough to get most people started with projection buffers. If you feel overwhelmed, don’t worry, that’s completely natural. One of the unfortunate realities of Visual Studio extensions is that there are an ungodly number of moving parts. The only way to ever hope to understand what is going on is to get your hands dirty. Take this project and start taking things apart and breaking it. You’ll gradually grow more comfortable with the many interfaces and how they interact with one another.
Finally, check out how we’re using this stuff in Code Connect and follow me on Twitter.
In Part 2: Analyzing Syntax Trees With LINQ, we explored different approaches to picking apart pieces of the syntax tree. This approach works well when you’re only interested in specific pieces of syntax (methods, classes, throw statement etc.) It’s great for singling out certain parts of the syntax tree for further investigation.
However, sometimes you’d like to operate on all nodes and tokens within a tree. Alternatively, the order in which you visit these nodes might be important. Perhaps you’re trying to convert C# into VB.Net. Or maybe you’d like to analyze a C# file and output a static HTML file with correct colorization. Both of these programs would require us to visit all nodes and tokens within a syntax tree in the correct order.
The abstract class CSharpSyntaxWalker allows us to construct our own syntax walker that can visit all nodes, tokens and trivia. We can simply inherit from CSharpSyntaxWalker and override the Visit() method to visit all nodes within the tree.
This file contains hidden or bidirectional Unicode text that may be interpreted or compiled differently than what appears below. To review, open the file in an editor that reveals hidden Unicode characters. Learn more about bidirectional Unicode characters
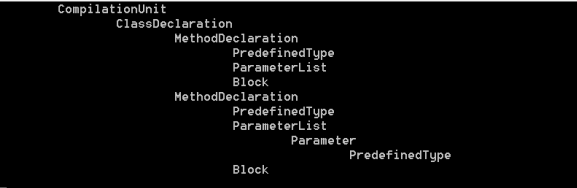
This short sample contains an implementation of CSharpSyntaxWalker called CustomWalker. CustomWalker overrides the Visit() method and prints the type of the node being currently visited. It’s important to note that CustomWalker.Visit() also calls the base.Visit(SyntaxNode) method. This allows the CSharpSyntaxWalker to visit all the child nodes of the current node.
The output for this program:
We can clearly see the various nodes of the syntax tree and their relationship with one another. There are two sibling MethodDeclarations who share the same parent ClassDeclaration.
This above example only visits the nodes of a syntax tree, but we can modify CustomWalker to visit tokens and trivia as well. The abstract class CSharpSyntaxWalker has a constructor that allows us to specify the depth with which we want to visit.
We can modify the above sample to print out the nodes and their corresponding tokens at each depth of the syntax tree.
This file contains hidden or bidirectional Unicode text that may be interpreted or compiled differently than what appears below. To review, open the file in an editor that reveals hidden Unicode characters. Learn more about bidirectional Unicode characters
Note: It’s important to pass the appropriate SyntaxWalkerDepth argument to CSharpSyntaxWalker. Otherwise, the overridden VisitToken() method is never called. Personally, I don’t think CSharpSyntaxWalker’s arguments should be optional. It was unclear to me that the most conservative depth would be walked when I was learning how to use this class.
The output when we use this CSharpSyntaxWalker:
The previous sample and this one share the same syntax tree. The output contains the same syntax nodes, but we’ve added the corresponding syntax tokens for each node.
In the above examples, we’ve visited all nodes and all tokens within a syntax tree. However, sometimes we’d only like to visit certain nodes, but in the predefined order that the CSharpSyntaxWalker provides. Thankfully the API allows us to filter the nodes we’d like to visit based on their syntax.
Instead of visiting all nodes as we did in previous samples, the following only visits ClassDeclarationSyntax and MethodDeclarationSyntax nodes. It’s extremely simple, just printing out the concatenation of the class’ name with the method’s name.
This file contains hidden or bidirectional Unicode text that may be interpreted or compiled differently than what appears below. To review, open the file in an editor that reveals hidden Unicode characters. Learn more about bidirectional Unicode characters
This sample simply outputs:
MyClass.MyMethod
MyOtherClass.MyMethod
The CSharpSyntaxWalker acts as a really great API for analyzing syntax trees. It allows one to accomplish a lot without resorting to using the semantic model and forcing a (possibly) expensive compilation. Whenever inspecting syntax trees and order is important, the CSharpSyntaxWalker is usually what you’re looking for.
A few weeks ago, I set out to work a 100 hour work week. Not 100 hours at the office, but 100 hours working on programming work for Code Connect.
Nick Winter and Bethany Soule have both posted about their experiences doing similar things. Nick clocked an astonishing 120 hours and Bethany worked for an impressive 87.
These two strike me as demi-gods of productivity. Nick has self-published a book on motivation and Bethany co-founded Beeminder, a company dedicated to keeping people motivated and on track for their goals.
I, on the other hand, haven’t done much self-examination on motivation beyond the usual “I should probably procrastinate less…”
Also, as I use Windows I had to build my own (much worse) version of Nick Winter’s Telepath Logger. Mine is absolute garbage and randomly breaks down all the time. (I suspect some jabs at Windows might be made, but they should probably be aimed at me, if anything).
In total, I clocked about 95 hours of productive time. I completely fell apart on the final day, when I got frustrated with a task and quit at 6:00 pm at my friends’ encouragement (More on that later). If I had kept going until 2:00 am, I would have met my 100 hour goal.
Here’s a look at my time-per-day.
Some thoughts on the whole experience:
1. The video was a huge motivator.
The idea that someone might see me cheating helped me resist the urge to go off task. I’ve always been a big believe in internal motivation and that it trumps extrinsic motivation ten times out of ten. This experiment changed my opinion on that a little bit. Perhaps certain external motivators can work together with internal motivators. Perhaps, certain external motivators are different than others and research has yet to distinguish between the two?
2. Have a well-defined goal at all points
The work that was easiest to do, was well-defined and relatively straightforward. When I say straightforward, I don’t mean simple and without thought. But at the same time, certain difficult architecture decisions seemed to almost paralyze me and stall productivity.
A big chunk of my time (Wednesday to Sunday) was spent trying to reverse-engineer how Visual Studio’s Intellisense worked. Occasionally I would get blocked, and not know where to look next. This instantly killed any “Flow” I had and left me frustrated. Perhaps tasks like this are not suited to be worked on for long periods of time.
3. Block everything distracting
Like Bethany, I compiled a list of distracting sites (Reddit, HackerNews etc.) and dumped them in my hosts file to redirect to 127.0.0.1. I’ve developed an awful habit, where I’ll open up a new tab, hit “R” or “H” and press enter and instantly be brought to Reddit or HackerNews. Blocking these sites helped prevent this. I knew that I could easily unblock the websites, but that forced it to be a conscious decision on my part, something I could more easily think through.
4. WARNING: YOUR FRIENDS ARE NOT YOUR FRIENDS
The points at which this week was the hardest was when my friends would try to convince me to take a break. Imagine all the excuses you tell yourself, coming at you from text, email and in-person.
“You’ve worked hard enough today, just come out”
“You need to take a break, no one could sustain this pace”
“Just take a break for a couple hours”
Ultimately, they won out and in a bout of frustration and nagging from friends, I gave up early. I hope to do this again, and next time I’ll completely get rid of my phone. I’m typically not distracted by it (I don’t text much and don’t get too much email) but it was absolutely the biggest distraction during this week.
I can’t blame them, though. I’d probably do the same thing to them.
5. It was not the happiest week I’ve had.
Nick Winter mentioned that his 120-hour work week was the happiest he’d been since he began quantifying his happiness. I’ve never quantified mine, but I’m 100% positive it was not my happiest week. There were points in each day at which I was downright miserable and wanted nothing more than to give up. I love programming and do it almost every day, but this was exhausting.
Nick also mentioned that it was easy for him. It was not easy for me. It was extremely hard. I missed exercise, I missed talking to friends and I missed doing things other than programming.
Final Thoughts
It was a pretty good week overall. I felt like I learned a lot about myself, my motivations and how to improve. In terms of technical progress, I knocked off most of my Git issues and now have a pretty intimate knowledge of Visual Studio’s Intellisense.
I need a second screen. I work entirely on a 13 inch ultrabook screen, which makes it a lot more difficult to look at different parts of large systems. Watching the other maniac week videos left me feeling extremely jealous.
If you want to see what I was building check out the demo video at: http://codeconnect.io
Syntax nodes are one of the primary elements of syntax trees. These nodes represent syntactic constructs such as declarations, statements, clauses, and expressions. Each category of syntax nodes is represented by a separate class derived from SyntaxNode.
Syntax tokens are the terminals of the language grammar, representing the smallest syntactic fragments of the code. They are never parents of other nodes or tokens. Syntax tokens consist of keywords, identifiers, literals, and punctuation.
While both definitions are accurate, they don’t give newcomers much insight on the difference between the two.
Let’s take a look at the following class and its Syntax Tree.
This file contains hidden or bidirectional Unicode text that may be interpreted or compiled differently than what appears below. To review, open the file in an editor that reveals hidden Unicode characters. Learn more about bidirectional Unicode characters
Syntax Tokens:
class
SimpleClass
Punctuation
void
SimpleMethod
Syntax Tokens cannot be broken into simpler pieces. They are the atomic units that make up a C# program. They are the leaves of a syntax tree. They always have a parent Syntax Node (as their parent cannot be a Syntax Token).
Syntax Nodes, on the other hand, are combinations of other Syntax Nodes and Syntax Tokens. They can always be broken into smaller pieces. In my experience, you’re most interested in Syntax Nodes when trying to reason about a syntax tree.
Note: I’ve also created a ten-minute video to explore the Syntax Tree API
I won’t spend much time explaining Syntax Trees. There are a number of posts that deal with that including the Roslyn Whitepaper. The main idea is that given a string containing C# code, the compiler creates a tree representation (called a Syntax Tree) of the string. Roslyn’s power is that it allows us to query this Syntax Tree with LINQ.
Here is a sample in which we use Roslyn create a Syntax Tree from a string. We must add references to Microsoft.CodeAnalysis and Microsoft.CodeAnalysis.CSharp. You can do so using Method 1 from Part 1 Installing Roslyn.
This file contains hidden or bidirectional Unicode text that may be interpreted or compiled differently than what appears below. To review, open the file in an editor that reveals hidden Unicode characters. Learn more about bidirectional Unicode characters
We first start by parsing a string containing C# code and getting the root of this syntax tree. From this point it’s extremely easy to retrieve elements we’d like using LINQ. Given the root of the tree, we look at all the descendant objects and filter them by their type. While we’ve only used ClassDeclarationSyntax and MethodDeclarationSyntax there are corresponding pieces of syntax for any C# feature.
Visual Studio’s Intellisense is extremely valuable for exploring the various types of C# syntax we can use.
We can composed more advanced LINQ expressions as one might expect:
This file contains hidden or bidirectional Unicode text that may be interpreted or compiled differently than what appears below. To review, open the file in an editor that reveals hidden Unicode characters. Learn more about bidirectional Unicode characters
Above, we start by finding all methods, and then filtering by those that accept parameters. We then take this method and work our way upwards through the tree with the Ancestors() method, searching for the first type that contains this method.
Hopefully this acts as a base for you to play around and explore the Syntax Tree API. There are some limitations to the kind of information you can discover at a purely syntactical level and to overcome these we must make use of Roslyn’s Semantic Model, which will be the subject of future posts.
We’ve been working hard on Code Connect and we’re at the point where we just need to finish development of a minimum viable product and release it in beta form. I’ve decided to take a page from the book of Nick Winter and embark on a Maniac Week. Nick Winter clocked 120 hours of programming during his, which works out to approximately 17 hours of work a day. Bethany Soule of Beeminder recently attempted the same feat; to work as much as she could during one week.
One thing Bethany and Nick Winter had going for them is that they were essentially motivation experts. Nick Winter has published an e-book on the topic, and Bethany co-founded Beeminder, a company dedicated to keeping people motivated and on track to meet their goals.
I have no such qualifications. I procrastinate, have no tools to keep me on track and have no real strategy to stay on track. To help me stay focused, I’ve blocked all websites I frequently waste time on. I’ve also built my own tool for Windows to take screenshots and webcam captures every minutes. Hopefully, I’ll be able to stitch these into a video documenting the experience sometime next week.


