It can be tricky to keep track nodes when applying changes to syntax trees. Every time we “change” a tree, we’re really creating a copy of it with our changes applied to that new tree. The moment we do that, any pieces of syntax we had references to earlier become invalid in the context of the new tree.
What’s this mean in practice? It’s tough to keep track of syntax nodes when we change syntax trees.
A recent Stack Overflow question touched on this. How can we get the symbol for a class that we’ve just added to a document? We can create a new class declaration, but the moment we add it to the document, we lose track of the node. So how can we keep track of the class so we can get the symbol for it once we’ve added it to the document?
A SyntaxAnnotation is a basically piece of metadata we can attach to a piece of syntax. As we manipulate the tree, the annotation sticks with that piece of syntax making it easy to find.
This file contains hidden or bidirectional Unicode text that may be interpreted or compiled differently than what appears below. To review, open the file in an editor that reveals hidden Unicode characters. Learn more about bidirectional Unicode characters
There are a couple of overloads available when creating a SyntaxAnnotation. We can specify Kind and Data to be attached to pieces of syntax. Data is used to attach extra information to a piece of syntax that we’d like to retrieve later. Kind is a field we can use to search for Syntax Annotations.
So instead of looking for the exact instance of our annotation on each node, we could search for annotations based on their kind:
This file contains hidden or bidirectional Unicode text that may be interpreted or compiled differently than what appears below. To review, open the file in an editor that reveals hidden Unicode characters. Learn more about bidirectional Unicode characters
This is just one of a few different ways for dealing with Roslyn’s immutable trees. It’s probably not the easiest to use if you’re making multiple changes and need to track multiple syntax nodes. (If that’s the case, I’d recommend the DocumentEditor). That said, it’s good to be aware of it so you can use it when it makes sense.
One drawback of Roslyn’s immutability is that it can sometimes make it tricky to apply multiple changes to a Document or SyntaxTree. Immutability means that every time we apply changes to a syntax tree, we’re given an entirely new syntax tree. By default we can’t compare nodes across trees, so what do we do when we want to make multiple changes to a syntax tree?
The DocumentEditor allows us to make multiple changes to a document and get the resulting document after the changes have been applied. Under the covers, the DocumentEditor is a thin layer over the SyntaxEditor.
We’ll use the DocumentEditor to change:
This file contains hidden or bidirectional Unicode text that may be interpreted or compiled differently than what appears below. To review, open the file in an editor that reveals hidden Unicode characters. Learn more about bidirectional Unicode characters
This file contains hidden or bidirectional Unicode text that may be interpreted or compiled differently than what appears below. To review, open the file in an editor that reveals hidden Unicode characters. Learn more about bidirectional Unicode characters
We’ll use the DocumentEditor to simultaneously insert an invocation before the first Console.WriteLine() and to insert another after the second.
Unfortunately there’s a ton of boiler plate when creating a Document from scratch. Typically you’ll get a Document from a Workspace so it shouldn’t be this bad:
This file contains hidden or bidirectional Unicode text that may be interpreted or compiled differently than what appears below. To review, open the file in an editor that reveals hidden Unicode characters. Learn more about bidirectional Unicode characters
All the familiar SyntaxNode methods are here. We can Insert, Replace and Remove nodes as we see fit, all based off of nodes in our original syntax tree. Many people find this approach more intuitive than building an entire CSharpSyntaxRewriter.
It can be somewhat difficult to debug things when they go wrong. When writing this post I was mistakenly trying to insert nodes after ifStatement.Else instead of ifStatement.Else.Statement. I was receiving an InvalidOperationException but the message wasn’t very useful and it took me quite some time to figure out what I was doing wrong. The documentation on InsertNodeAfter says:
This node must be of a compatible type to be placed in the same list containing the existing node.
How can we know which types of nodes are compatible with one another? I don’t think there’s a good answer here. We essentially have to learn which nodes are compatible ourselves. As usual the Syntax Visualizer and Roslyn Quoter are the best tools for figuring out what kinds of nodes you should be creating.
It’s worth noting that the DocumentEditor exposes the SemanticModel of your original document. You may need this when editing the original document and making decisions about what you’d like to change.
It’s also worth noting that the underlying SyntaxEditor exposes a SyntaxGenerator that you can use to build syntax nodes without relying on the more verbose SyntaxFactory.
Last time (three months ago, jeez) we talked about building our first analyzer and what we get out of the box with the default analyzer template. Today we’ll talk about the second half of the analyzer project: The Code Fix Provider.
CodeFixProvider.cs
The first thing to notice is that our class inherits from CodeFixProvider. If you take a quick look at CodeFixProvider, you’ll see that it expects you to provide at least two things:
FixableDiagnosticsIds – A list of diagnostic IDs that we would like our code fix to deal with. We would have defined these IDs in our original analyzer.
RegisterCodeFixesAsync – Registers our code fix within Visual Studio to handle our diagnostic(s).
This file contains hidden or bidirectional Unicode text that may be interpreted or compiled differently than what appears below. To review, open the file in an editor that reveals hidden Unicode characters. Learn more about bidirectional Unicode characters
First, we can see that we’re exporting a code fix provider for C# with the name “Analyzer1CodeFixProvider”. We can also specify additional languages such as VB if you’re writing a multi-language code fix. Note that we have to specify the name explicitly here. (Name is a property in ExportCodeFixProvider. I’d actually never come across this attribute-specific syntax before.)
To start, we’ve got the title of the analyzer which is self explanatory. We’ll expose this title to Visual Studio when we register our code fix action.
Next, we’ve got to expose a list of diagnostics for which we’d like to provide our code fix. In this case, we expose the analyzer we created in the introduction to analyzers.
Finally, the default codefix template overrides the optional GetFixAllProvider. In this case they provide a BatchFixer. The BatchFixer computes all the required changes in parallel and then applies them to the solution at one time.
Now we’ll take a look at the last two methods given to us in CodeFixProvider.cs
This file contains hidden or bidirectional Unicode text that may be interpreted or compiled differently than what appears below. To review, open the file in an editor that reveals hidden Unicode characters. Learn more about bidirectional Unicode characters
The first is RegisterCodeFixesAsync and it accepts a CodeFixContext. The CodeFixContext has information about where we can apply our code fix, and what diagnostics are available for us to register our code fix against. CodFixContext provides a list of diagnostics for us to choose from based on what we exposed in FixableDiagnosticIds.
Based on my experiments, RegisterCodeFixesAsync is run every time the Visual Studio light bulb appears due to a diagnostic we’ve declared interest in. At this point we can register a action to run that we’d like to apply if the user selects our code fix. We do this with context.RegisterCodeFix(). We pass in a title, a function that returns a solution with our change and an optional equivalence key. The title is simply what will be displayed to the user when they see our fix as an option. In the default template it’s “Make uppercase” which you can see below:
Clicking on the code fix runs MakeUppercaseAsync. There’s admittedly a lot of overhead here for what seems like a trivial change. The real work occurs in Renamer.RenameSymbolAsync() an API that quickly and easily renames symbols for us across an entire solution. Remember that Roslyn objects are immutable, so we are given an entirely new solution (newSolution) which we return from our method. Now Visual Studio will replace the previous solution with our updated copy.
One final note to make is regarding equivalenceKey. The equivalence key is used to match our code fix against other code fixes and see whether or not they’re the same. To my knowledge, there’s no commonly agreed upon format for these keys. However it looks like projects such as StyleCopAnalyzers are using a similar approach to Microsoft and name theirs with a two letter code followed by a number (eg. SA1510CodeFixProvider).
And there you have it. That’s the base case analyzer that ships with Visual Studio. Obviously we can build much more powerful analyzers and code fixes, but this project should serve as a nice starting point for most people. For more advanced analyzers check out StyleCopAnalyzers, Code Cracker or the Roslyn Analyzers.
Today we’re pleased to release the Alive Beta. This is our biggest release since our initial alpha launch one and a half months ago. The graduation from alpha to beta is more than just a name change and includes a bunch of new features and bugfixes.
Overhauled UI
Alive’s original UI did a poor job telling you what was going on. We’ve rebuilt it to explicitly show you what’s going on when you’re using Alive. We’ve now made it clear when Alive is working, when it has encountered an error and when execution has succeeded.
Keyboard Shortcuts
First posted on our public issue tracker by RaffaelG, this feature has been long overdue. Now you can launch Alive directly from the keyboard by pressing: Ctr-[, Ctr-[
Expanded Project Support
We’ve been trying hard to support more project types as we try to reach parity with Visual Studio. If Visual Studio can load and run it, we think Alive should be able to as well.
It’s taken a lot of work, but we’ve made progress on ASP .Net 5 projects. The Alive beta now supports DNX projects that target the full framework. We’re working hard to support .Net Core 5 as well, but it’s been difficult with a lot of this stuff being undocumented and in beta. On the bright side, we plan to have support for .Net Core 5 in our v1.0 release.
Misc Features and Bug Fixes
As usual, we’ve included a number of bug fixes and miscellaneous improvements.
You can now invoke static generic methods directly
You can now pass any parameters to static methods
Improved method tracking
The Full Release Notes may be found on our issue tracker.
If you’re interested in using Alive, you can purchase a license from our website.
Today I was working on a sample Visual Studio extension and I had the following question:
Given a Visual Studio ITextSnapshot or ITextBuffer how can I get the corresponding Roslyn Document?
It turns out there’s a bunch of extension methods that make this easy. They’re not shipped with the Microsoft.CodeAnalysis NuGet package so you’ll need to pull them down manually:
Install the EditorFeatures NuGet package: Install-Package Microsoft.CodeAnalysis.EditorFeatures.Text
Include the appropriate a using statement: using Microsoft.CodeAnalysis.Text;
Now you’ll be able to map from ITextBuffer and ITextSnapshot back to Roslyn’s Document, SourceText and Workspace objects.
To most of us, this is what programming “is”. But when we really stop to think about it, this is a pretty bizarre way to create. We’ve divided up programming into these separate worlds of “design-time” and “debug-time”.
At design-time we make our changes, we imagine what the computer will do and start the program up. At “debug-time” we test our theories and see if we were right.
It’s like painting with a blindfold on. Once blindfolded, we make our marks and do our best to imagine how we’d like our painting to look. Occasionally we remove the blindfold see how badly we’ve done. Then we get to put it back on and try to correct our mistakes.
This seemed backwards to us. We wanted a frictionless design loop. One where we gain an instant connection to the programs we create.
So we built a tool to do this.
What is it?
Alive is a live programming environment for Visual Studio that currently supports C#. It blurs the line between “design-time” and “run-time”. As you write your code, you’re shown exactly what the code will do at runtime. It responds instantly as you update variables and manipulate code.
In a sense, Alive lets you travel through time. You can rewind and fast forward through loops. You can jump up and down the callstack of a recursive method call. This is fantastic for quickly tracking down bugs and edge cases.
See Alive in action:
What can it do?
Alive really shines when you’ve written unit tests and can run any code touched by one of your tests. You simply select the test you’d like to run against your method and watch as the values pop into existence. This is a lifesaver when trying to understand or modify code written by someone else.
Alive can also run any static method if you’re willing to provide parameters for it. This is useful when exploring and playing around with small programs. Essentially Alive can act as a replacement for a REPL and allow you to iterate and experiment quickly.
What can it not do?
It’s important to note that areas that Alive was not built to support. Alive isn’t very good at working with long running code. If you’re backtesting stock data, Alive probably isn’t the tool you’re looking for. This is because occasionally we’re re-running your code. We’re bound to the speed of your code and can’t show you the results until your code is finished running. (We’re working on providing partial results to you as you type. Unfortunately, this functionality won’t make it into the June alpha).
Alive should be used with caution when running code with real world side effects. If you’re constantly adding items to your database while using Alive you should expect to see a few extras items in there. We’re not running your code on every keystroke, but we are running it a handful of times as you type.
Alive is not great for running against non-deterministic code. If your unit tests periodically don’t run certain pieces of code, it can be difficult for us to know which unit tests correspond to which methods. You can work around this issue by selecting the unit tests you know will hit a given method.
What’s next?
Our next major milestone will be the alpha release on June 1. We’re currently testing Alive against various unit test frameworks including XUnit, NUnit and MSTest. We’re still working to solve some bugs and improve performance on large projects.
To save 30% on a licesnse, you can pre-order at https://comealive.io/#preorder. The license will be valid for one year after the release of v1.0. You may use Alive after the license expires, but you will no longer receive updates and bugfixes for Alive.
Roslyn analyzers allow companies and individuals to enforce certain rules within a code base. My understanding is that there are two primary uses for analyzers:
Broadly enforce coding styles and best practices
Specifically guide individuals consuming a library
The first use is largely a replacement for tools like StyleCop and FxCop. We can use analyzers to enforce stylistic choices like “All private variables must start with a lowercase letter” and “Use spaces not tabs”. In fact, you can start using StyleCop.Analyzers today. From a NuGet command line simply use:
Install-Package StyleCop.Analyzers -Pre
The second use is to release library specific analyzers meant to guide consumers of your library. For example, we might want to ensure that no one does the following:
This file contains hidden or bidirectional Unicode text that may be interpreted or compiled differently than what appears below. To review, open the file in an editor that reveals hidden Unicode characters. Learn more about bidirectional Unicode characters
System.DateTime is immutable, so the above code is misleading. Instead the user should have written the following:
This file contains hidden or bidirectional Unicode text that may be interpreted or compiled differently than what appears below. To review, open the file in an editor that reveals hidden Unicode characters. Learn more about bidirectional Unicode characters
Analyzers allow library authors to help guide their users. In that sense, I hope that it becomes standard to release a set of analyzers alongside new libraries. It’s difficult to say if this will actually happen, as it requires extra work from library authors.
Download the Roslyn SDK Templates
The templates do not ship with Visual Studio 2015. To install them go to:
Tools > Extensions and Updates > Online.
Search for “Roslyn SDK” and find the templates that correspond to your version. I’m using Visual Studio 2015 RC. I’ve chosen the package selected below:
After installing the templates, you must restart Visual Studio.
Creating your first analyzer
Navigate to:
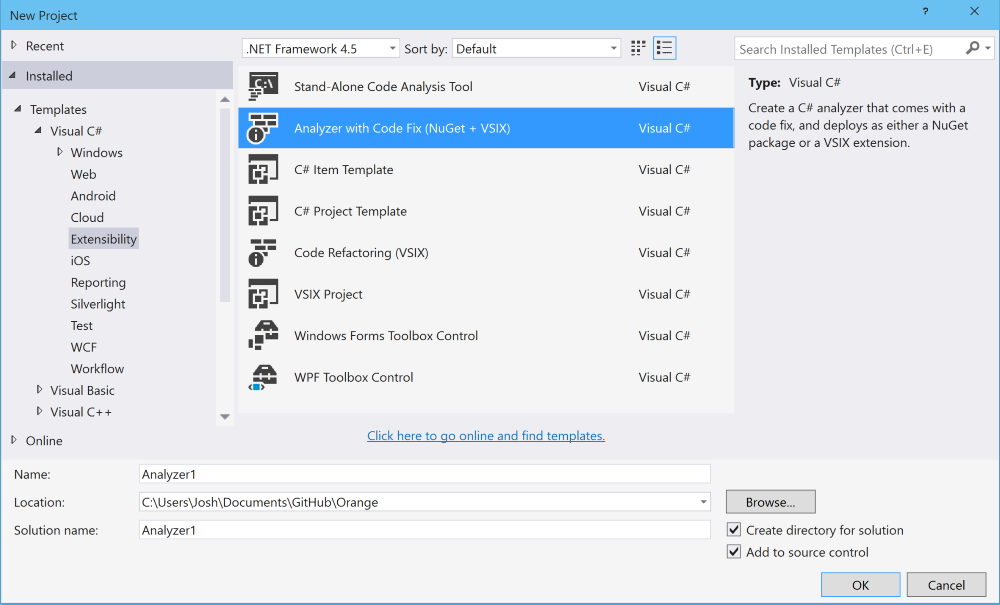
File > New Project > Extensibility > Analyzer with Code Fix
Give your analyzer a name and click “OK”. I’ve taken the creative liberty of naming mine "Analyzer1". From here we’re presented a README that explains that building our project creates both a .vsix for Visual Studio and a .nupkg for submission to NuGet. There are also instructions on how to properly distribute your analyzer as a NuGet package.
Let’s take a look at what we’re given right out of the box:
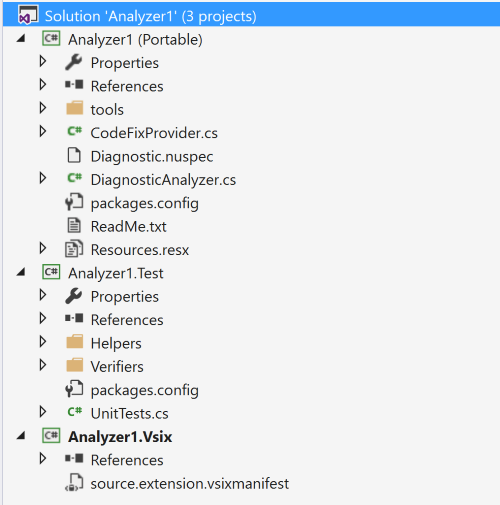
We’re given three projects:
Analyzer1 – The brain of our analyzer. This is where all code analysis is done and code fixes are figured out.
Anylzer1.Test – A default test project with some helper classes to make testing easier.
Analyzer.Vsix – The startup project that will be deployed to Visual Studio. The .vsixmanifest tells Visual Studio that you’d like to export an analyzer and a code fix.
To run the project, simply press F5. A new instance of Visual Studio will launch. This Visual Studio is called the Experimental Hive and has its own set of settings within the Windows Registry. Note: It’s a good practice to choose a different theme for your Experimental Hive so you don’t get them mixed up.
Once you open a solution, you’ll notice Visual Studio complaining about a lot of new warnings. The analyzer we’re running simply creates a warning when it sees any type with lowercase letters in its name. It’s obviously not very useful, but allows us to also demonstrate the code fix included in this sample:
Now that we’ve got a rough idea of what each project is for, we’ll explore Analyzer1 and what we’re given for free.
DiagnosticAnalyzer.cs
The first thing to notice is that our Analyzer inherits from the abstract class DiagnosticAnalyzer. This class expects us to do two things:
Expose a set of diagnostics our analyzer is responsible for via SupportedDiagnostics.
Let’s take a look at the properties and fields in the first half of the file:
This file contains hidden or bidirectional Unicode text that may be interpreted or compiled differently than what appears below. To review, open the file in an editor that reveals hidden Unicode characters. Learn more about bidirectional Unicode characters
public class Analyzer1Analyzer : DiagnosticAnalyzer
{
public const string DiagnosticId = "Analyzer1";
// You can change these strings in the Resources.resx file. If you do not want your analyzer to be localize-able, you can use regular strings for Title and MessageFormat.
internal static readonly LocalizableString Title = new LocalizableResourceString(nameof(Resources.AnalyzerTitle), Resources.ResourceManager, typeof(Resources));
internal static readonly LocalizableString MessageFormat = new LocalizableResourceString(nameof(Resources.AnalyzerMessageFormat), Resources.ResourceManager, typeof(Resources));
internal static readonly LocalizableString Description = new LocalizableResourceString(nameof(Resources.AnalyzerDescription), Resources.ResourceManager, typeof(Resources));
It may seem overwhelming at first, but bear with me. First notice the DiagnosticAnalyzer attribute applied to the class. This specifies what language or languages our analyzer will be run on. Today, you can only specify C# and VB .Net.
Looking within the class, the first five properties are simply strings to describe our analyzer and provide messages to users list. By default, the analyzer is set up to encourage localization and allows you define your title, message format and description as localizable strings. However if localization scares you like it does me, you make them simple strings.
Take a moment to look at DiagnosticDescriptor Rule. It defines a DiagnosticSeverity of “Warning”. I suspect you’ll likely want to stick with Warning, but if you feel like imposing on consumers of your analyzer, you could upgrade the severity to Error and prevent compilation completely. Note: I don’t recommend this. If your analyzer misbehaves and reports errors where there are none, the user will remove it.
Finally, lets take a look at the two generated methods:
This file contains hidden or bidirectional Unicode text that may be interpreted or compiled differently than what appears below. To review, open the file in an editor that reveals hidden Unicode characters. Learn more about bidirectional Unicode characters
The Initialize() method sets up the analyzer by registering the AnalyzeSymbol method to fire when semantic analysis has been run on a NamedType symbol. This is only one example out of a handful of ways to trigger an analyzer. We can register our analyzer to run on various triggers including compilation, analysis of codeblocks and analysis of syntax trees. We’ll flush out AnalysisContext in further posts.
The AnalyzeSymbol() method is where we actually do the analysis we’ve been talking about. This is where we would use the Syntax Tree and Symbol APIs to diagnose and report issues. In the case of this analyzer it simply takes the INamedTypSymbol provided and checks whether any of the characters in its name are lowercase. If they are, we report this diagnostic using the Rule we defined earlier.
This may seem like an awful lot of boilerplate for such a simple analyzer. However, once you start building complicated analyzers, you’ll find that the analysis code quickly starts to dominate and that the boilerplate isn’t so bad.
Next time, we’ll explore the CodeFixProvider and how we can offer solutions to problems we find in a user’s code.
2015/07/23 Edit: All of these problems should now be fixed in the latest Roslyn NuGet packages
We first looked at MSBuildWorkspace in Part 6 Working with Workspaces. MSBuildWorkpace works really well when loading up solutions from .sln files. It properly understands .csproj files so we don’t have to worry about tracking down references, documents, or MSBuild targets.
However, when compiling solutions that contained Portable Class Libraries (PCLs) I had been continuously running into frustrating problems with missing references to System.Runtime.dll. For example I’d see a handful of errors like:
error CS0012: The type 'Object' is defined in an assembly that is not referenced.

You must add a reference to assembly 'System.Runtime, Version=4.0.0.0, Culture=neutral, PublicKeyToken=b03f5f7f11d50a3a'.
I’d also seen this issue pop up within Visual Studio when working on XAML and when debugging.
In our case we needed to add a reference to System.Runtime.dll. I won’t bother to show the code for this as it’s fraught with its own set of problems. Although it resolves our System.Object reference, we quickly run into other problems with other types such as System.Tasks.Task. Manually adding these references was definitely not going to scale.
The Workaround
Originally this problem was reported as a bug within MSBuildWorkspace. After all, why wouldn’t it resolve the references properly when we open the solution? Visual Studio obviously seemed to be capable of figuring the references out…
It turns out there’s a MSBuild property called CheckForSystemRuntimeDependency. And we can set this to true and all our PCL worries seem to go away.
Simply create your MSBuildWorkspace with:
This file contains hidden or bidirectional Unicode text that may be interpreted or compiled differently than what appears below. To review, open the file in an editor that reveals hidden Unicode characters. Learn more about bidirectional Unicode characters
At Code Connect we’ve been working hard on a project that rewrites a user’s code and then compiles the rewritten solution. Without giving too much away, it essentially acts as a logger and can intercept all variable assignments.
So the following code:
This file contains hidden or bidirectional Unicode text that may be interpreted or compiled differently than what appears below. To review, open the file in an editor that reveals hidden Unicode characters. Learn more about bidirectional Unicode characters
This file contains hidden or bidirectional Unicode text that may be interpreted or compiled differently than what appears below. To review, open the file in an editor that reveals hidden Unicode characters. Learn more about bidirectional Unicode characters
At some point we decided we no longer wanted to inject the LogValue method directly into the code we were instrumenting. We would place it in an entirely different namespace: CodeConnect.Instrumentation.
Here was how we originally created the invocation to LogValue:
This file contains hidden or bidirectional Unicode text that may be interpreted or compiled differently than what appears below. To review, open the file in an editor that reveals hidden Unicode characters. Learn more about bidirectional Unicode characters
So we figured we’d incorporate our new namespace as follows:
This file contains hidden or bidirectional Unicode text that may be interpreted or compiled differently than what appears below. To review, open the file in an editor that reveals hidden Unicode characters. Learn more about bidirectional Unicode characters
At first glance, everything checked out. Calling .ToFullString() on this node revealed what looked like a proper invocation:
CodeConnect.Instrumentation.LogValue("x", 5);
However, try as we may we could not get our code to compile. We would constantly errors telling us the CodeConnect.Instrumentation type didn’t exist:
CS0103 at line 12 (character 19): The name 'CodeConnect.Instrumentation' does not exist in the current context.
We checked our references, we checked our rewritten solution and we checked the spelling at least a dozen times. Everything checked out. Eventually we did the classic “Which change broken this functionality?” walk through out Git history. (Note: If I had written more complete unit tests when I first wrote the rewriter, we would have caught this a lot quicker!)
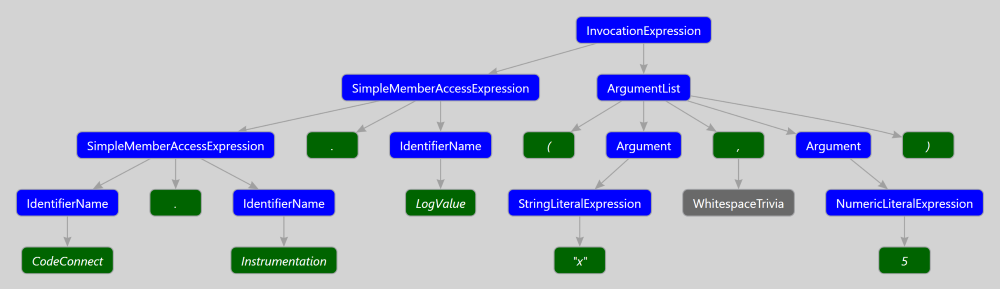
We realized it was the change to the rewriter that introduced this problem. It took some time before we realized exactly what was wrong. Once again the ever-truthful Syntax Visualizer (now packaged with the .NET Compiler Tools SDK) came to the rescue and showed us what the syntax tree for a valid invocation of CodeConnect.Instrumentation.LogValue("x", 5); would look like:
After looking over the above tree, we realized we were supposed to create a chain of SimpleMemberAccessExpressions, not a single InvocationExpression with the name “CodeConnect.Instrumentation.LogValue”. When the binder when to bind this invocation to a symbol, it failed as no method can be declared with this name. The tree we had created was invalid and could never have been parsed out of a user’s source code.
This is a key point to understand when creating or rewriting syntax trees:
No one will stop you from creating invalid syntax trees.
> The Roslyn Syntax construction API does not guarantee that you can only build valid programs.
We can take this to its logical extreme and create trees that don’t make any sense. For example, we can create WhitespaceTrivia whose value is “public void M() { }” .
This file contains hidden or bidirectional Unicode text that may be interpreted or compiled differently than what appears below. To review, open the file in an editor that reveals hidden Unicode characters. Learn more about bidirectional Unicode characters
The output is misleading as it causes the reader to make assumptions about how the syntax tree must be formed. In my experience the only true arbiter of truth when it comes to syntax tree is the Roslyn Syntax Visualizer. I’d love for it to be expanded to visualize in memory trees while debugging.
The takeaways here:
Don’t trust .ToString() or .ToFullString()
Understand that you may accidentally generate invalid trees
Control flow analysis is used to understand the various entry and exit points within a block of code and to answer questions about reachability. If we’re analyzing a method, we might be interested in all the points at which we can return out of the method. If we’re analyzing a for-loop, we might be interested in all the places we break or continue.
We trigger control flow analysis via an extension method on the SemanticModel. This returns an instance of ControlFlowAnalysisto us that exposes the following properties:
EntryPoints – The set of statements inside the region that are the destination of branches outside the region.
ExitPoints – The set of statements inside a region that jump to locations outside the region.
EndPointIsReachable – Indicates whether a region completes normally. Returns true if and only if the end of the last statement is reachable or the entire region contains no statements.
ReturnStatements – The set of returns statements within a region.
Succeeded – Returns true if and only if analysis was successful. Analysis can fail if the region does not properly span a single expression, a single statement, or a contiguous series of statements within the enclosing block.
Basic usage of the API:
This file contains hidden or bidirectional Unicode text that may be interpreted or compiled differently than what appears below. To review, open the file in an editor that reveals hidden Unicode characters. Learn more about bidirectional Unicode characters
Alternatively, we can specify two statements and analyze the statements between the two. The following example demonstrates this and the usage of EntryPoints:
This file contains hidden or bidirectional Unicode text that may be interpreted or compiled differently than what appears below. To review, open the file in an editor that reveals hidden Unicode characters. Learn more about bidirectional Unicode characters
In the above example, we see an example of a possible entry point label L3. To the best of my knowledge, labels are the only possible entry points.
Finally, we’ll take a look at answering questions about reachability. In the following, neither the start point or the end point is reachable:
This file contains hidden or bidirectional Unicode text that may be interpreted or compiled differently than what appears below. To review, open the file in an editor that reveals hidden Unicode characters. Learn more about bidirectional Unicode characters
Overall, the Control Flow API seems a lot more intuitive than the Data Flow Analysis API. It requires less knowledge of the C# specification and is straightforward to work with. At Code Connect, we’ve been using it when rewriting and logging methods. Although it looks like no one has experimented much with this API, I’m really interested to see what uses others will come up with.
![10a0f002fb69e0472d180c3b59ccef5a[1]](https://joshvarty.com/wp-content/uploads/2015/08/10a0f002fb69e0472d180c3b59ccef5a1.gif)