Roslyn analyzers allow companies and individuals to enforce certain rules within a code base. My understanding is that there are two primary uses for analyzers:
- Broadly enforce coding styles and best practices
- Specifically guide individuals consuming a library
The first use is largely a replacement for tools like StyleCop and FxCop. We can use analyzers to enforce stylistic choices like “All private variables must start with a lowercase letter” and “Use spaces not tabs”. In fact, you can start using StyleCop.Analyzers today. From a NuGet command line simply use:
Install-Package StyleCop.Analyzers -Pre
The second use is to release library specific analyzers meant to guide consumers of your library. For example, we might want to ensure that no one does the following:
This file contains hidden or bidirectional Unicode text that may be interpreted or compiled differently than what appears below. To review, open the file in an editor that reveals hidden Unicode characters.
Learn more about bidirectional Unicode characters
| var dateTime = System.DateTime.UtcNow; | |
| dateTime.AddDays(1); |
System.DateTime is immutable, so the above code is misleading. Instead the user should have written the following:
This file contains hidden or bidirectional Unicode text that may be interpreted or compiled differently than what appears below. To review, open the file in an editor that reveals hidden Unicode characters.
Learn more about bidirectional Unicode characters
| var dateTime = System.DateTime.UtcNow; | |
| dateTime = dateTime.AddDays(1); |
Analyzers allow library authors to help guide their users. In that sense, I hope that it becomes standard to release a set of analyzers alongside new libraries. It’s difficult to say if this will actually happen, as it requires extra work from library authors.
Download the Roslyn SDK Templates
The templates do not ship with Visual Studio 2015. To install them go to:
Tools > Extensions and Updates > Online.
Search for “Roslyn SDK” and find the templates that correspond to your version. I’m using Visual Studio 2015 RC. I’ve chosen the package selected below:

After installing the templates, you must restart Visual Studio.
Creating your first analyzer
Navigate to:
File > New Project > Extensibility > Analyzer with Code Fix
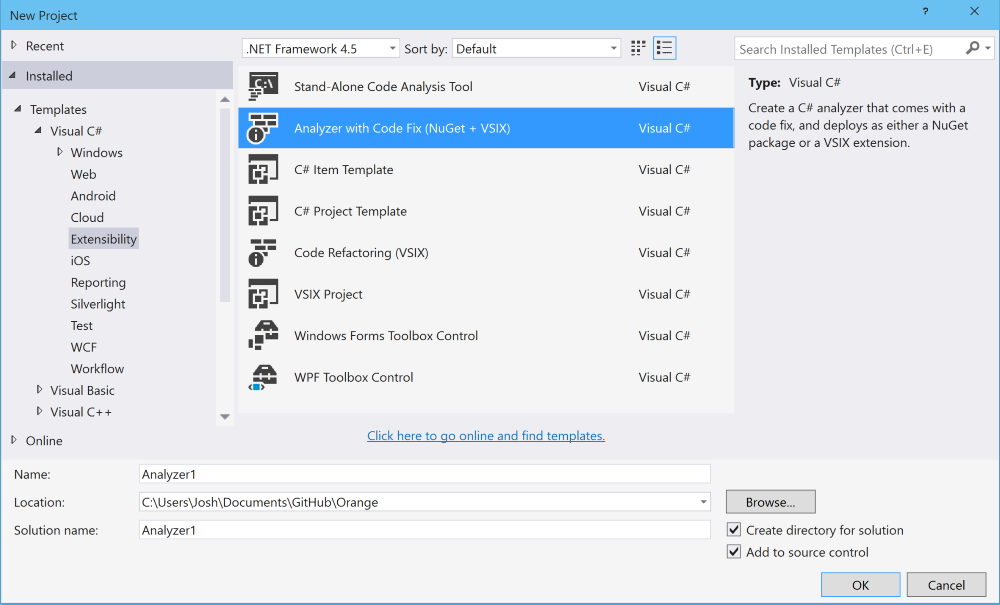
Give your analyzer a name and click “OK”. I’ve taken the creative liberty of naming mine "Analyzer1". From here we’re presented a README that explains that building our project creates both a .vsix for Visual Studio and a .nupkg for submission to NuGet. There are also instructions on how to properly distribute your analyzer as a NuGet package.
Let’s take a look at what we’re given right out of the box:
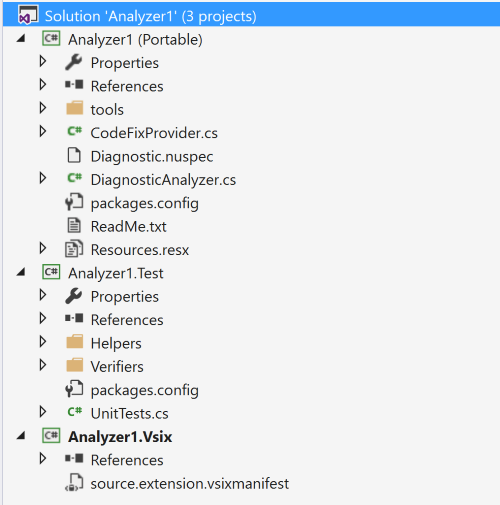
We’re given three projects:
Analyzer1– The brain of our analyzer. This is where all code analysis is done and code fixes are figured out.Anylzer1.Test– A default test project with some helper classes to make testing easier.Analyzer.Vsix– The startup project that will be deployed to Visual Studio. The.vsixmanifesttells Visual Studio that you’d like to export an analyzer and a code fix.
To run the project, simply press F5. A new instance of Visual Studio will launch. This Visual Studio is called the Experimental Hive and has its own set of settings within the Windows Registry. Note: It’s a good practice to choose a different theme for your Experimental Hive so you don’t get them mixed up.
Once you open a solution, you’ll notice Visual Studio complaining about a lot of new warnings. The analyzer we’re running simply creates a warning when it sees any type with lowercase letters in its name. It’s obviously not very useful, but allows us to also demonstrate the code fix included in this sample:

Now that we’ve got a rough idea of what each project is for, we’ll explore Analyzer1 and what we’re given for free.
DiagnosticAnalyzer.cs
The first thing to notice is that our Analyzer inherits from the abstract class DiagnosticAnalyzer. This class expects us to do two things:
- Expose a set of diagnostics our analyzer is responsible for via
SupportedDiagnostics. - Initialize our analyzer via
Initialize(AnalysisContext).
Let’s take a look at the properties and fields in the first half of the file:
This file contains hidden or bidirectional Unicode text that may be interpreted or compiled differently than what appears below. To review, open the file in an editor that reveals hidden Unicode characters.
Learn more about bidirectional Unicode characters
| [DiagnosticAnalyzer(LanguageNames.CSharp)] | |
| public class Analyzer1Analyzer : DiagnosticAnalyzer | |
| { | |
| public const string DiagnosticId = "Analyzer1"; | |
| // You can change these strings in the Resources.resx file. If you do not want your analyzer to be localize-able, you can use regular strings for Title and MessageFormat. | |
| internal static readonly LocalizableString Title = new LocalizableResourceString(nameof(Resources.AnalyzerTitle), Resources.ResourceManager, typeof(Resources)); | |
| internal static readonly LocalizableString MessageFormat = new LocalizableResourceString(nameof(Resources.AnalyzerMessageFormat), Resources.ResourceManager, typeof(Resources)); | |
| internal static readonly LocalizableString Description = new LocalizableResourceString(nameof(Resources.AnalyzerDescription), Resources.ResourceManager, typeof(Resources)); | |
| internal const string Category = "Naming"; | |
| internal static DiagnosticDescriptor Rule = new DiagnosticDescriptor(DiagnosticId, Title, MessageFormat, Category, DiagnosticSeverity.Warning, isEnabledByDefault: true, description: Description); | |
| public override ImmutableArray<DiagnosticDescriptor> SupportedDiagnostics { get { return ImmutableArray.Create(Rule); } } | |
| … | |
| } |
It may seem overwhelming at first, but bear with me. First notice the DiagnosticAnalyzer attribute applied to the class. This specifies what language or languages our analyzer will be run on. Today, you can only specify C# and VB .Net.
Looking within the class, the first five properties are simply strings to describe our analyzer and provide messages to users list. By default, the analyzer is set up to encourage localization and allows you define your title, message format and description as localizable strings. However if localization scares you like it does me, you make them simple strings.
Take a moment to look at DiagnosticDescriptor Rule. It defines a DiagnosticSeverity of “Warning”. I suspect you’ll likely want to stick with Warning, but if you feel like imposing on consumers of your analyzer, you could upgrade the severity to Error and prevent compilation completely. Note: I don’t recommend this. If your analyzer misbehaves and reports errors where there are none, the user will remove it.
Finally, lets take a look at the two generated methods:
This file contains hidden or bidirectional Unicode text that may be interpreted or compiled differently than what appears below. To review, open the file in an editor that reveals hidden Unicode characters.
Learn more about bidirectional Unicode characters
| [DiagnosticAnalyzer(LanguageNames.CSharp)] | |
| public class Analyzer1Analyzer : DiagnosticAnalyzer | |
| { | |
| … | |
| public override void Initialize(AnalysisContext context) | |
| { | |
| // TODO: Consider registering other actions that act on syntax instead of or in addition to symbols | |
| context.RegisterSymbolAction(AnalyzeSymbol, SymbolKind.NamedType); | |
| } | |
| private static void AnalyzeSymbol(SymbolAnalysisContext context) | |
| { | |
| // TODO: Replace the following code with your own analysis, generating Diagnostic objects for any issues you find | |
| var namedTypeSymbol = (INamedTypeSymbol)context.Symbol; | |
| // Find just those named type symbols with names containing lowercase letters. | |
| if (namedTypeSymbol.Name.ToCharArray().Any(char.IsLower)) | |
| { | |
| // For all such symbols, produce a diagnostic. | |
| var diagnostic = Diagnostic.Create(Rule, namedTypeSymbol.Locations[0], namedTypeSymbol.Name); | |
| context.ReportDiagnostic(diagnostic); | |
| } | |
| } | |
| } |
The Initialize() method sets up the analyzer by registering the AnalyzeSymbol method to fire when semantic analysis has been run on a NamedType symbol. This is only one example out of a handful of ways to trigger an analyzer. We can register our analyzer to run on various triggers including compilation, analysis of codeblocks and analysis of syntax trees. We’ll flush out AnalysisContext in further posts.
The AnalyzeSymbol() method is where we actually do the analysis we’ve been talking about. This is where we would use the Syntax Tree and Symbol APIs to diagnose and report issues. In the case of this analyzer it simply takes the INamedTypSymbol provided and checks whether any of the characters in its name are lowercase. If they are, we report this diagnostic using the Rule we defined earlier.
This may seem like an awful lot of boilerplate for such a simple analyzer. However, once you start building complicated analyzers, you’ll find that the analysis code quickly starts to dominate and that the boilerplate isn’t so bad.
Next time, we’ll explore the CodeFixProvider and how we can offer solutions to problems we find in a user’s code.

>StyleCop.Analyzers
correct link please)
https://github.com/DotNetAnalyzers/StyleCopAnalyzers
Thanks for the heads up. I’ve corrected that link.
This is completely outdated, NONE of whats in this guide, works in vs2015!
I just double checked now, and the analyzer templates in VS2015 still generate the same code as I’ve got posted here.
What’s not working for you?
I just checked now. Seems totally OK, I hope I haven’t missed anything.